There are many tools in Adobe Illustrator that can confuse a new user in the field of creating illustrations. One such group is the Scissor, knife, and eraser tool that is used to cut a vector object. While all three work very similarly with minute variations, this article will focus on the scissor tool in Illustrator as the anchor topic. In contrast, knife and eraser tool will work as the peripheral topic.
In straightforward terms, the scissor tool does what regular scissors do in real life; cutting paper in a straight line. With this tool in Illustrator, you can cut a vector object in straight, edge-to-edge lines. There are many more sophisticated uses of this, which will be discussed later. But to understand the basics, it is used to cut objects.
The erase tool in Illustrator works like an eraser. It can delete selected parts of the illustration (vector-based). Unlike scissor tool which works on straight lines running across edges, erase tool can clear out any part of the illustration. Just select the radius of the eraser and start rubbing off the sections you want to erase.
The knife tool combines the ease of the eraser tool and the precision of the scissor tool. Just like a knife, you can cut across an illustration of vector objects in any line/direction you want. Objects can be cut diagonally, in straight lines, and in any proportions you want.
Using the Scissor tool
The scissor tool is relatively simple and easy to use. To understand the essential workings of it, let’s create a very simple rectangle. To create a box, choose the rectangle tool from the toolbox or just press “M.”
Select the scissor tool from the toolbox or just press “C.” You’ll notice that the cursor has turned into a crosshair. Using this crosshair, we can target anchor points in the object.


Note: Scissor tool only works on the outlines. This means that you cannot cut anything inside the illustration. It can be used to cut something from edge to edge or to open a closed shape (explained later).
As shown in the image below, click on the diagonal corners of the rectangle using the scissor tool. Like cutting a paper diagonally, this also does the same. After you click on the corners, you’ll see a message saying, “Shape expanded.” This indicates that the cut was successful.

After cutting, you won’t see any difference until you select one side of the shape and move it. As you can see from the image below, the shape has been cleanly cut in half. This is the basic function of the scissor tool in Illustrator. But it is not the only one.
Using the scissor tool with outlines
The scissor tool can cut and open the closed outlines of any vector object. To demonstrate the basics, I have created three shapes; a square, a circle, and a triangle. Convert the shapes into outlines either by selecting them and pressing “Shift + X” or by switching to outlines in the toolbox.
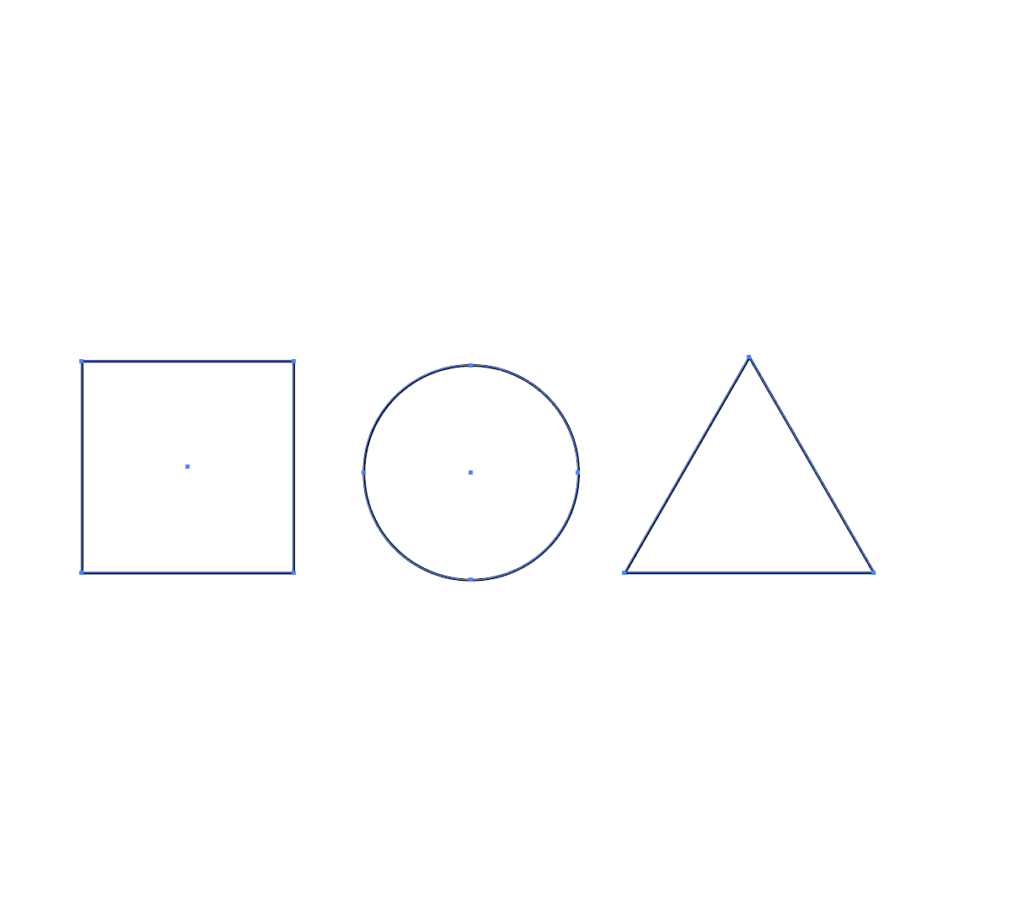

With the outlined shapes selected, click on the upper-right point (on the top point of the circle) using the scissor tool. This will cut-open these outlines, as shown in the pictures below.
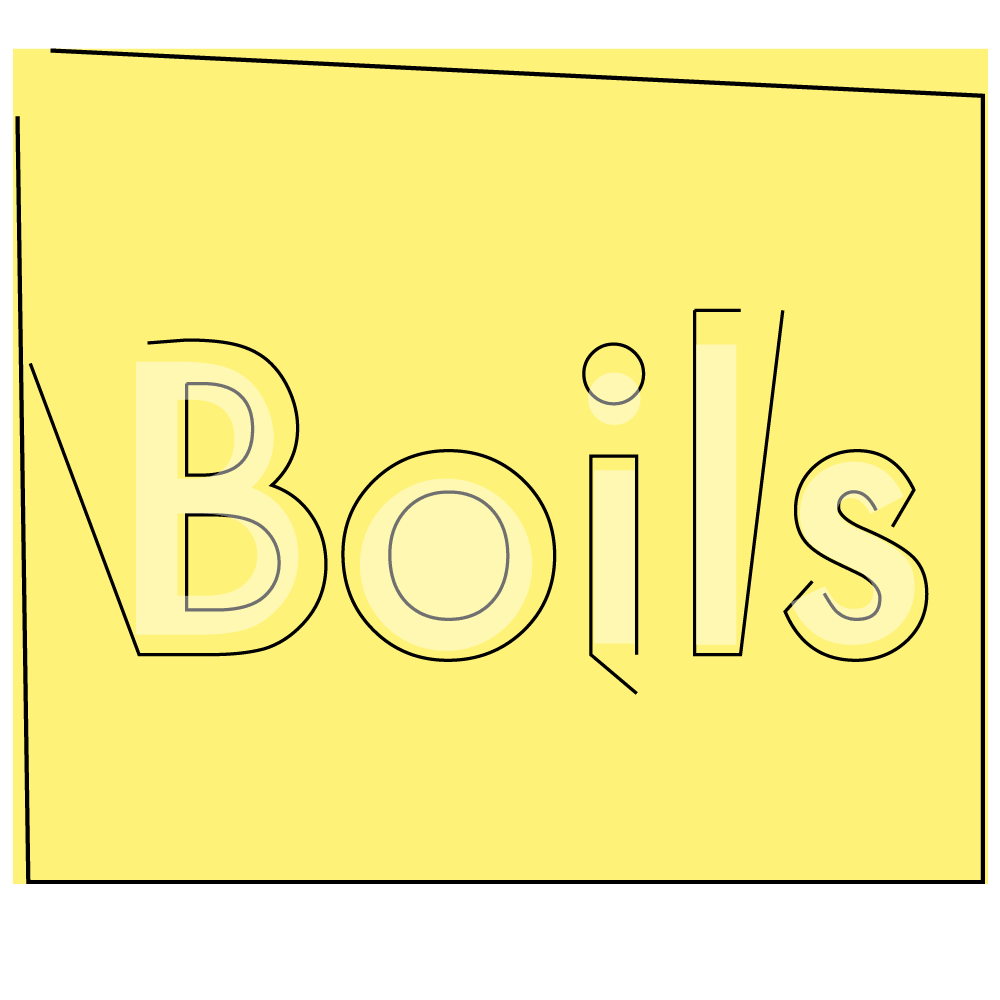
Not just shapes, but you can do the same with text as well. But remember first to create outlines”. After that, select the achor points you want to open, and with a little bit of creativity and addition, you can create some typography designs. You should create something that you are experiencing. Look what I made;

Using the knife tool for typography
The knife tool gives you the flexibility of cutting a vector in whichever direction you want. This is not very effective for shapes, but it can work wonderfully for text-based vectors. It allows you to create custom text-based illustrations quickly and easily. There are a few extra steps involved that must be done before you start using the scissors.

First, write the text that you want to work on. Make sure for typos. After you proofread, right-click on the text and choose “create outlines”. This will convert the text into a vector object.
Now, select the text you want to work on. Use the knife tool (select it by right-clicking on the scissor box on the toolbar) and then draw a line; however, you want to cut the text-based vector. Show your creativity here. You’ll notice that the vector has been cut with the line.
You can change the colors, texture, etc. to create a contrast between the two parts of the same text. This is what I have created. Again, create what you feel inside, this will unleash the true creativity. I also created a variation with the top part of the text. Just add roughness to it (5% size and 90% detailing), and you’ll get similar results (not the disease though).

Creating sliced text effect
Who doesn’t like the cool sliced text effect? I don’t. But still, I’ll show you how you can create this effect in the easiest possible way. There’s not much to it. Just select the text and convert it to outlines. Also, remember to ungroup these text files. Done? Let’s move to the next step.
Using the knife tool, draw a line across the text file. Then draw another line in the middle to divide the text vector into three sections. Then just select the individual parts and move to any side you want. This will create a sliced text effect.

This concludes the article. I hope you learned what you came to learn from this article. And as with all the Illustrator tutorials that I create, I’d say that nothing is better than practicing yourself, creating mistakes, creating new things, and keeping the process fun. You can read more articles related to the Illustrator tutorial that will surely help you create better illustrations. So go ahead and create something beautiful, that is how you’ll learn.
Read more articles related to Adobe Illustrator