Sometimes, it is the small changes that matter the most. A small change can be anything, from waking up earlier to taking a bath every day. We are glad to say that Adobe has finally understood it and brought us the Intertwine tool.
With the coming of Adobe Illustrator 2023, designers and illustrators saw a couple of really great changes, and a few “meh” changes as well.
Thankfully, the Intertwine tool comes under the “great changes.” So what is the Intertwine tool and why are we hyping it so much? Let’s get into the meat of the matter.
Adobe Intertwine Tool
The new Intertwine tool allows you to intertwine the paths of simple and complex illustrations with just one click or swipe. Not only illustrations, but you can also intertwine different texts together.
It works like the shape builder tool wherein you have to point and click the cursor to the parts of the illustration you want to intertwine.
While it may sound very simple and easy, the reason why we are praising this update so much is that it helps you save a lot of time and effort.
We’ll look into how to use this tool and what to keep in mind while using it. But before that, let’s explain why this tool is such a great addition to the roster of Illustrator tools.
Intertwining Before
Before the addition of the Intertwine tool, it was possible to create interlocking or overlapping illustrations. But while this effect was simple, doing it was a tedious process.
Illustrators would require to select the two illustrations after placing them in overlapping positions. Then they would have to choose the “Pathfinder” tool to divide the overlapping elements.
The process continued as then they would have to ungroup the elements, use the “Direct Selection” tool and then manually select each of the elements that had to be overlapped.
If reading about it takes so much time, imagine how much time actually doing it took. Of course, it wasn’t as time taking as painting the Mona Lisa.
But giving time to paint Mona Lisa would give you, well, the painting of Mona Lisa. But using the “Pathfinder” tool would give you a decent illustration. Get the difference?
Apart from being time-consuming, the other problem with using the “Pathfinder” tool, or just messing with the “path” of the illustration was that it was destructive.
Destructive editing means that to achieve the effect in an illustration, you are actually destroying the parts of the illustration.
Imagine if you wanted to change something in a canvas painting. Destructive editing would be by taking out a cut-out of the portion you want to change and adding another one.
Non-destructive editing means that you can just put a piece of clean canvas on top of the painting and the additional art. The painting remains intact.
How to Use the Intertwine Tool
This section is going to be the shortest section of the article and that proves how great of a tool the Intertwine tool is. It is fast, simple, and easy to understand and use.
Here is the step-by-step guide to using the Intertwine tool.
Step 1: We are going to skip the part where you create the artboard, select the dimension, and are ready with the artwork. If you are looking at an article on how to use the Intertwine tool, we assume you are familiar with the basics.
We are using a simple illustration and a text file to keep this tutorial simple. As you start playing around with the tool, using it on complex illustrations will become lucid.

We are using the image of two squares of different colors.
Place the two squares close and make them overlap. The intertwining will occur in the overlapping areas.
Step 2: We want the left side of the yellow square to go behind the top side of the blue square. So let’s select both squares.

Step 3: With both the squares selected, go to Object > Intertwine > Make. This will change the shape of the cursor.

Step 4: With the Intertwine cursor, select the area that overlaps and click to make the change. After you are done, this will be the result.
With Text and Complex Illustrations
Now that you know the gist of the tool, let’s try it on something more practical. Let’s face it, if you are making two overlapping squares as a graphic designer, you are not a graphic designer.
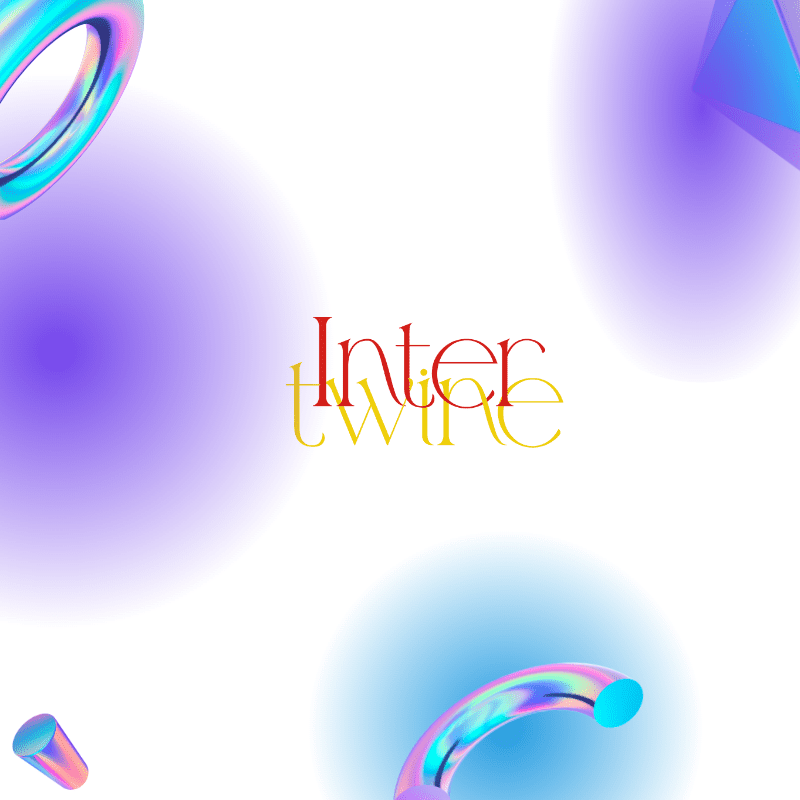
For this example, we have used a font that has a good amount of curves (wink wink) to make the intertwine work better. You can choose any font you want.
The process goes the same. Select the texts after you have placed them appropriately and then go to Object > Intertwine > Make.

Click on the parts which you want to send back or bring to the front. Illustrator does the rest. This is one task that I am happy to lose to smart machines.
Non-Destructive
Remember what we said about destructive and non-destructive editing? You can take benefit of non-destructive editing with the Intertwine tool.
The text files that you have created and Intertwine can be edited easily. Just double-click on the text and write whatever you want. Some adjustments might be needed.
Take a look at the result we got just by double-clicking and changing the text with no other adjustment. Don’t ask why we chose the word “app” as it makes no sense here.

Conclusion
So that was all about the uses and benefits of the Intertwine tool. If you are having trouble using the tool, do not worry. With time and practice, you will master this tool.
Stay a Little Longer?
If you liked this article, how about you stay a bit longer with us and check out these amazing articles related to this one: